Class 6 Maths Chapter 2 Lines and Angles – easy notes, concepts, NCERT book solutions, important questions, worksheet and answers. Learn about lines, line segments, rays, angles and different types of angles with simple explanations.
Chapter 2 — Lines and Angles
Class 6 Mathematics | Ganita Prakash | Complete Concepts, Diagrams and In-text Solutions
What is a Point?
A point shows a precise location. It has no length, breadth or height.
Line Segment
A line segment is the shortest path joining two points.
What is a Line?
A line extends endlessly in both directions.
What is a Ray?
A ray starts at one point and goes endlessly in one direction.
1. Can you help Rihan and Sheetal find their answers?
Rihan marked a point on a piece of paper. How many lines can he draw that pass through the point?
Sheetal marked two points on a piece of paper. How many different lines can she draw that pass through both of the points?
- Through one point, many lines can be drawn.
- Through two distinct points, exactly one line can be drawn.
2. Name the line segments in Fig. 2.4. Which of the five marked points are on exactly one of the line segments? Which are on two of the line segments?

Line segments: LM, MP, PQ and QR.
Exactly one: L and R.
Exactly two: M, P and Q.
3. Name the rays shown in Fig. 2.5. Is T the starting point of each of these rays?

No. T is the starting point of TA, TB and TN. N is the starting point of NB.
4. Draw a rough figure and write labels appropriately to illustrate each of the following:
a. OP and OQ meet at O.
b. XY and PQ intersect at point M.
c. Line l contains points E and F but not point D.
d. Point P lies on AB.

5. In Fig. 2.6, name:
a. Five points
b. A line
c. Four rays
d. Five line segments
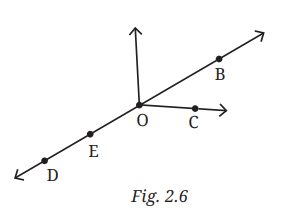
a. Five points: D, E, O, B and C.
b. A line: DE. Other correct pairs on the same line are also possible.
c. Four rays: OC, OB, OE and OD.
d. Five line segments: DE, DO, DB, EO and EB. Other correct segments are also possible.
6. Here is a ray OA (Fig. 2.7). It starts at O and passes through the point A. It also passes through the point B.
a. Can you also name it as OB? Why?
b. Can we write OA as AO? Why or why not?
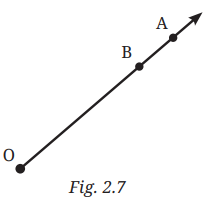
a. Yes. Both OA and OB have the same starting point O and lie in the same direction.
b. No. OA starts at O, while AO starts at A.
What is an Angle?
An angle is formed by two rays having a common starting point.
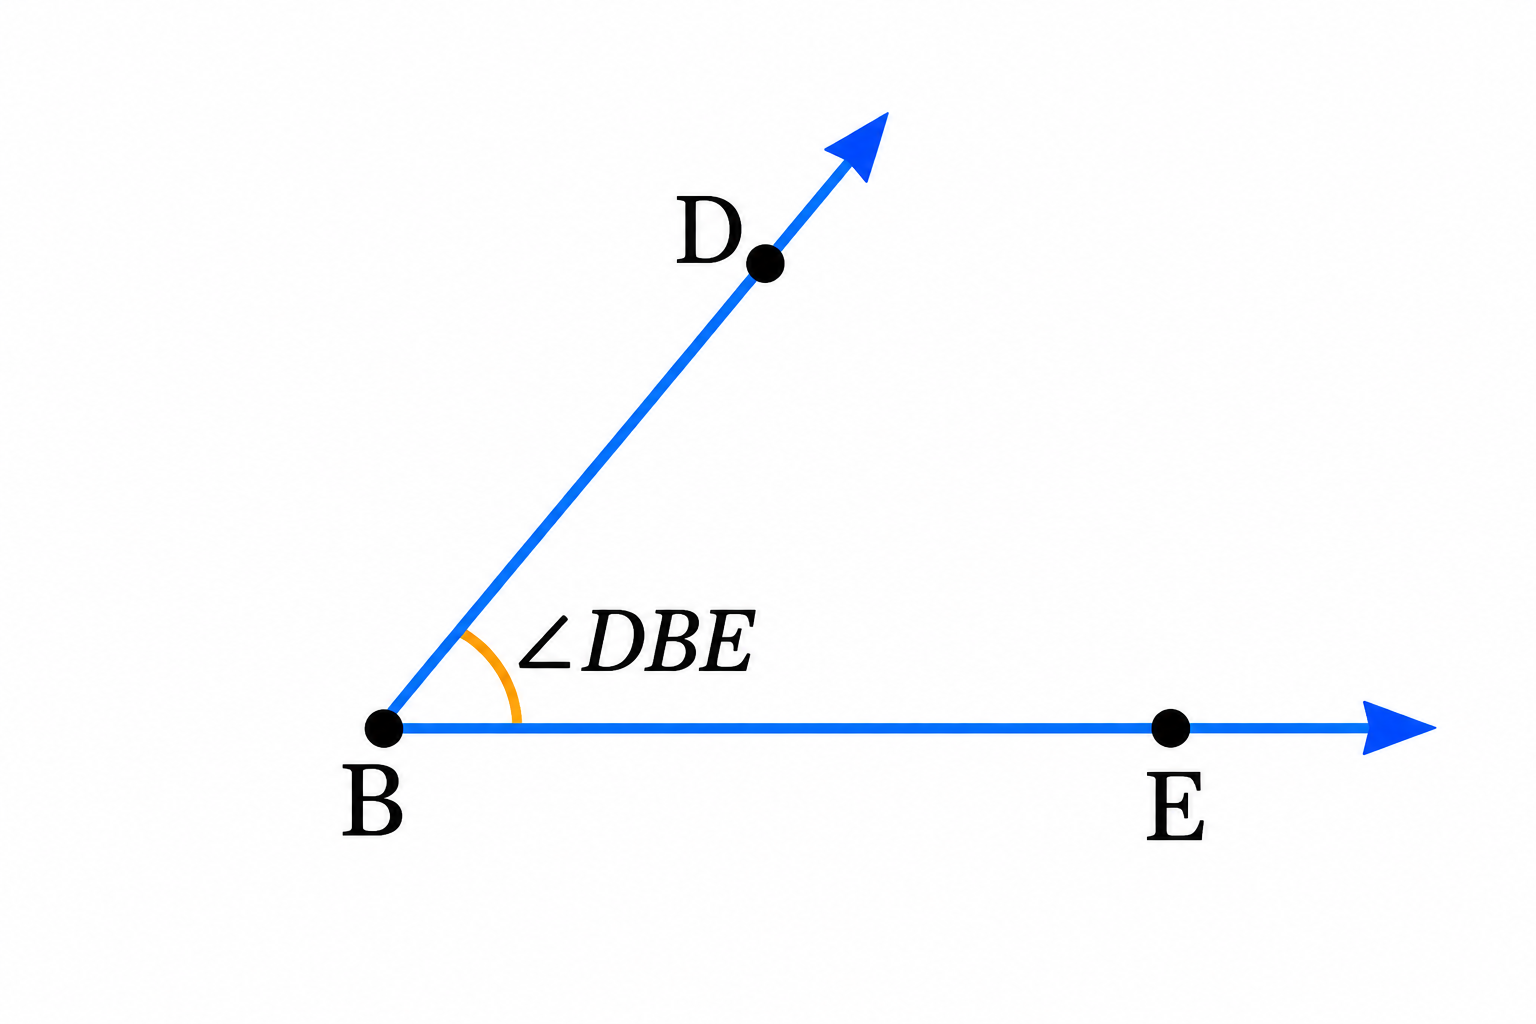
Arms: The two rays forming the angle.
Important: In a three-letter name of an angle, the vertex is always the middle letter.
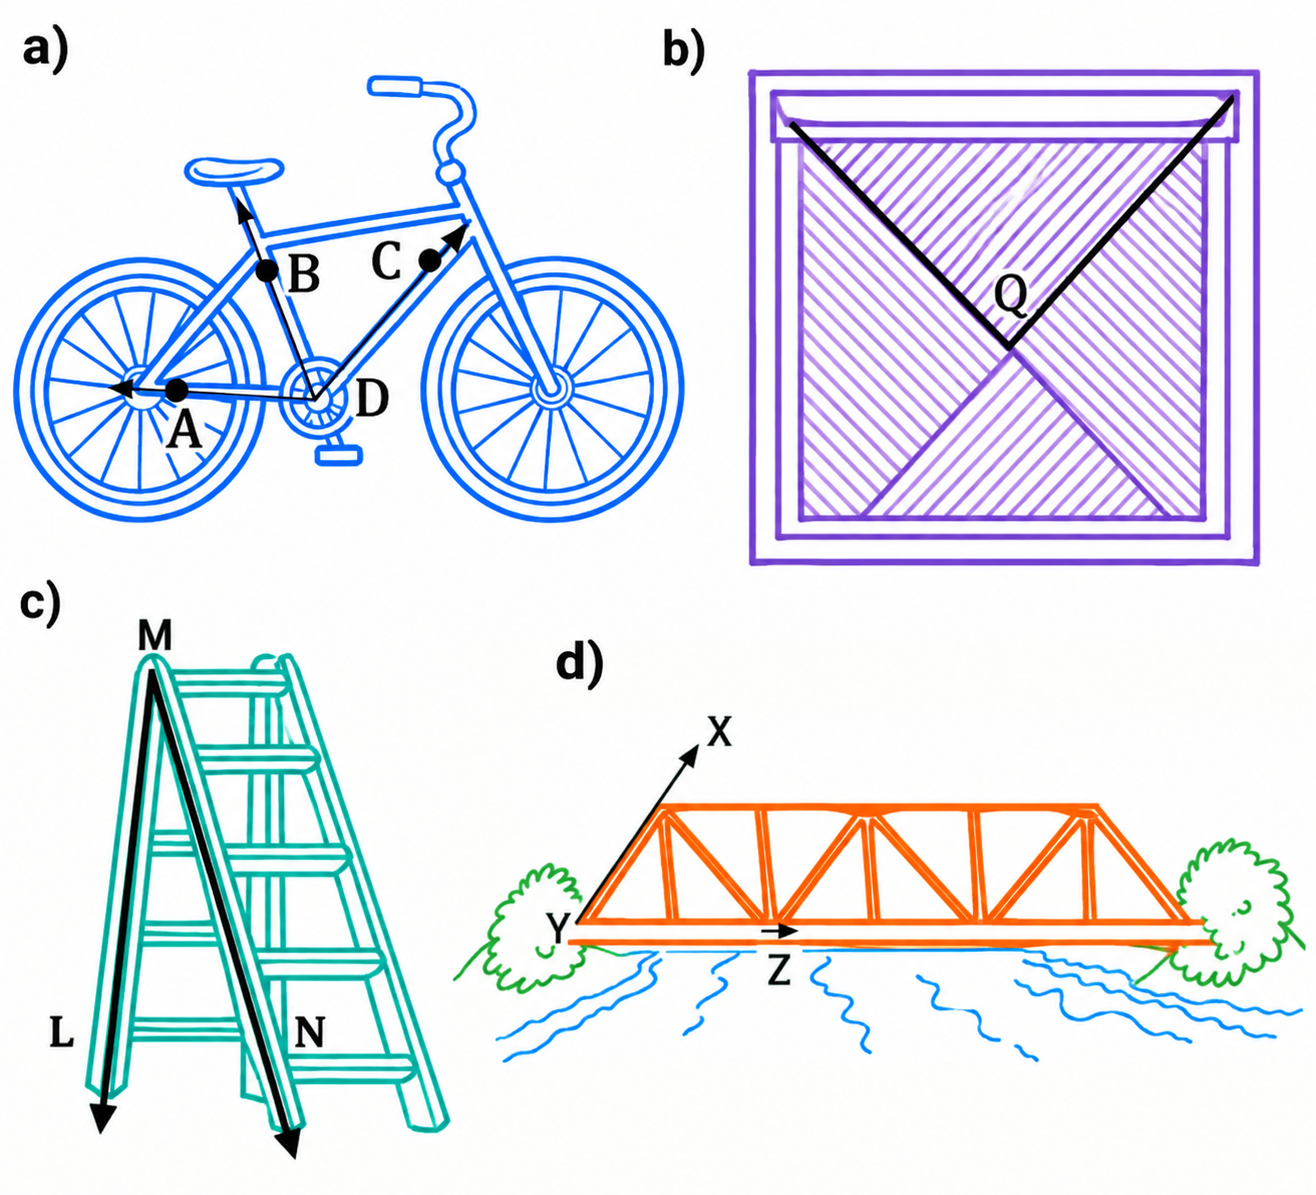
1. Can you find the angles in the given pictures? Draw the rays forming any one of the angles and name the vertex of the angle.
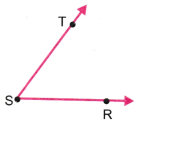
2. Draw and label an angle with arms ST and SR.
3. Explain why ∠APB cannot be labelled as ∠P.
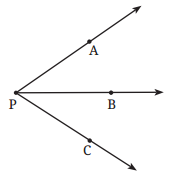
4. Name the angles marked in the given figure.

5. Mark any three points on your paper that are not on one line. Label them A, B, C. Draw all possible lines going through pairs of these points. How many lines do you get? Name them. How many angles can you name using A, B, C? Write them down, and mark each of them with a curve as in Fig. 2.9.
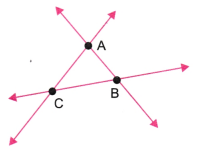
There are 3 lines:
AB, BC and CA.
There are 3 angles:
∠ABC, ∠BCA and ∠CAB.
6. Now mark any four points on your paper so that no three of them are on one line. Label them A, B, C, D. Draw all possible lines going through pairs of these points. How many lines do you get? Name them. How many angles can you name using A, B, C, D? Write them all down, and mark each of them with a curve as in Fig. 2.9.
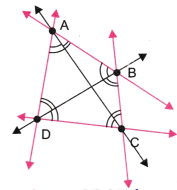
We get 6 lines:
AB, BC, CD, DA, AC and BD.
One complete set of named angles is:
∠BAC, ∠CAD, ∠BAD, ∠ADB, ∠BDC, ∠ADC, ∠DCA, ∠ACB, ∠DCB, ∠CBD, ∠DBA and ∠CBA.
Angle Size Means Amount of Turn
The size of an angle depends on how much one ray has to turn to reach the other ray.
Is it always easy to compare two angles?
Comparing by Superimposition
To compare two angles, place one angle over the other so that their vertices overlap.
1. Fold a rectangular sheet of paper, then draw a line along the fold created. Name and compare the angles formed between the fold and the sides of the paper. Make different angles by folding a rectangular sheet of paper and compare the angles. Which is the largest and smallest angle you made?
Do it yourself
2. In each case, determine which angle is greater and why.
a. ∠AOB or ∠XOY
b. ∠AOB or ∠XOB
c. ∠XOB or ∠XOC
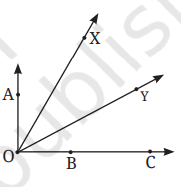
a. ∠AOB is greater. by Superimposition
b. ∠AOB is greater, by Superimposition.
c. ∠XOB and ∠XOC are equal, Superimposition.
3. Which angle is greater: ∠XOY or ∠AOB? Give reasons.
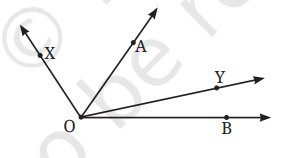
Is it possible to draw OC such that the two angles are equal to each other in size?
If a straight angle is formed by half of a full turn, how much of a full turn will form a right angle?
1. How many right angles do the windows of your classroom contain? Do you see other right angles in your classroom?
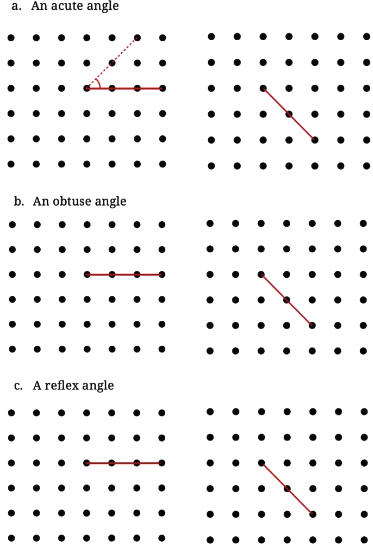
2. Join A to other grid points in the figure by a straight line to get a straight angle. What are all the different ways of doing it?

3. Now join A to other grid points in the figure by a straight line to get a right angle. What are all the different ways of doing it?
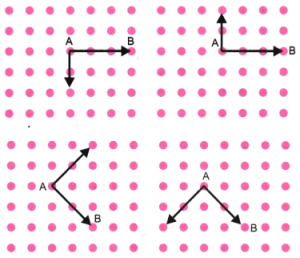
4. Get a slanting crease on the paper. Now, try to get another crease that is perpendicular to the slanting crease.
a. How many right angles do you have now? Justify why the angles are exact right angles.
b. Describe how you folded the paper so that any other person who doesn’t know the process can simply follow your description to get the right angle.
a. Four right angles are formed. Each is one-fourth of a complete turn.
b. do it yourself Fold the paper so that the slanting crease lies exactly over itself. Make the new crease. The two creases meet at right angles.
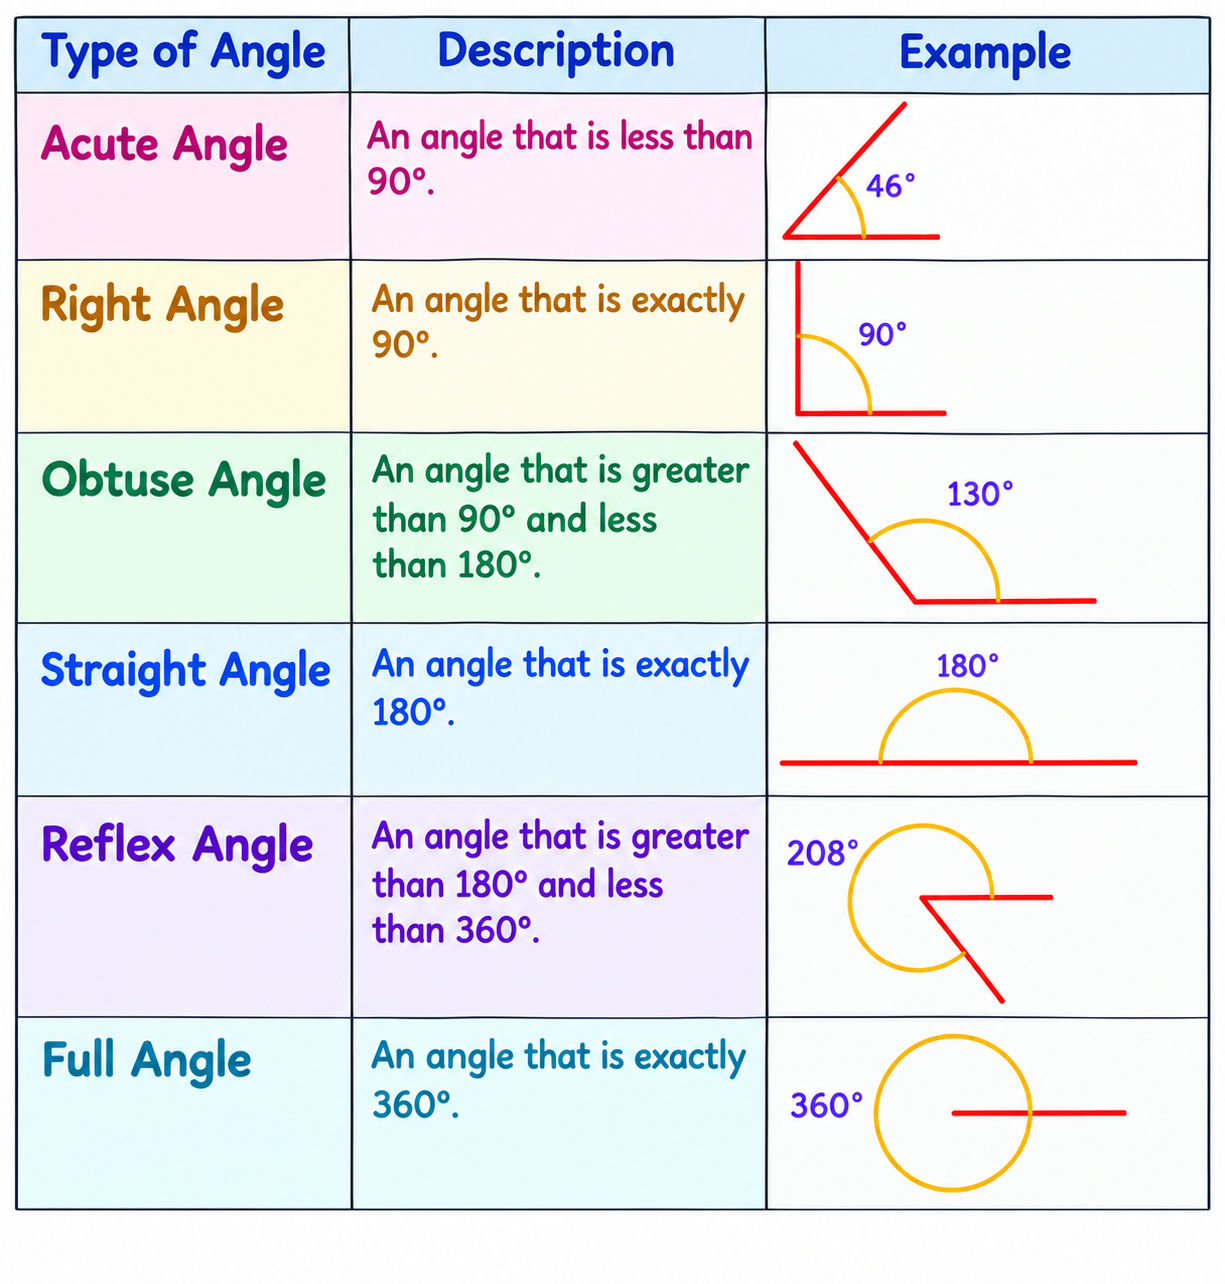
1. Identify acute, right, obtuse and straight angles in the previous figures.
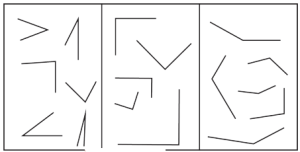
do it yourself Acute angles are smaller than a right angle, right angles are exactly 90°, obtuse angles are between 90° and 180°, and straight angles are 180°.
2. Make a few acute angles and a few obtuse angles. Draw them in different orientations.
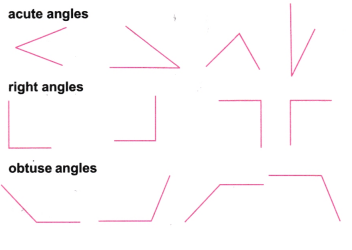
3. Do you know what the words acute and obtuse mean? Acute means sharp and obtuse means blunt. Why do you think these words have been chosen?
4. Find out the number of acute angles in each of the figures below. What will be the next figure and how many acute angles will it have? Do you notice any pattern in the numbers?
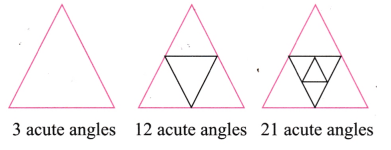
The numbers are 3, 12 and 21.
The next figure will have 30 acute angles.
The pattern increases by 9 each time.
Degree Measure
A complete turn is divided into 360 equal parts. Each part is 1 degree.
Straight angle = 180°
Right angle = 90°

1. Write the measures of the following angles:
a. ∠KAL
b. ∠WAL
c. ∠TAK
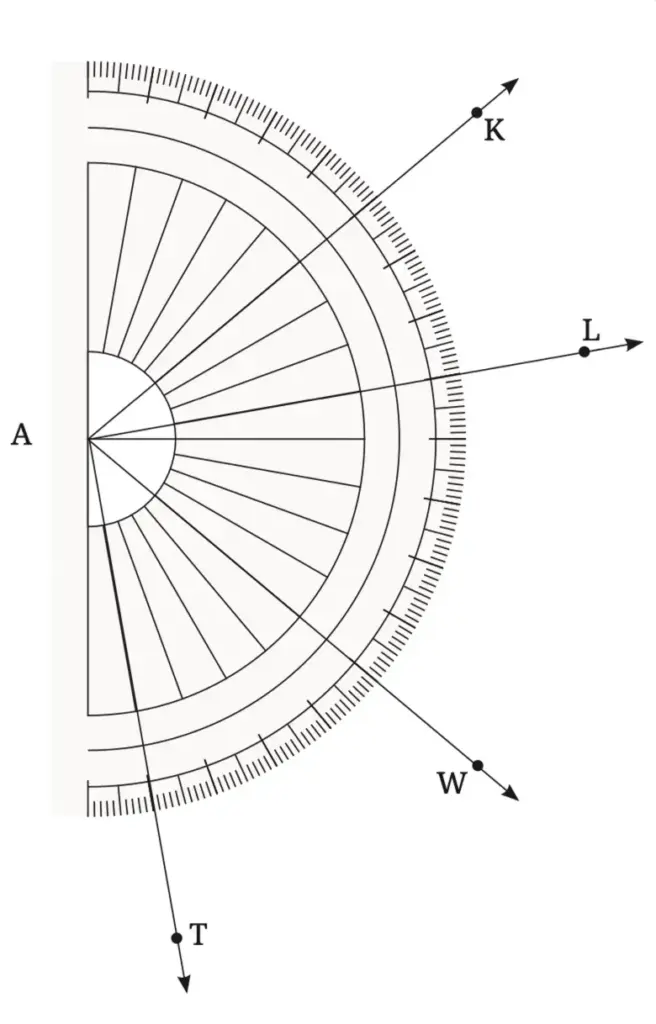
a. ∠KAL = 30°
b. ∠WAL = 50°
c. ∠TAK = 120°
Name the different angles in the figure and write their measures.
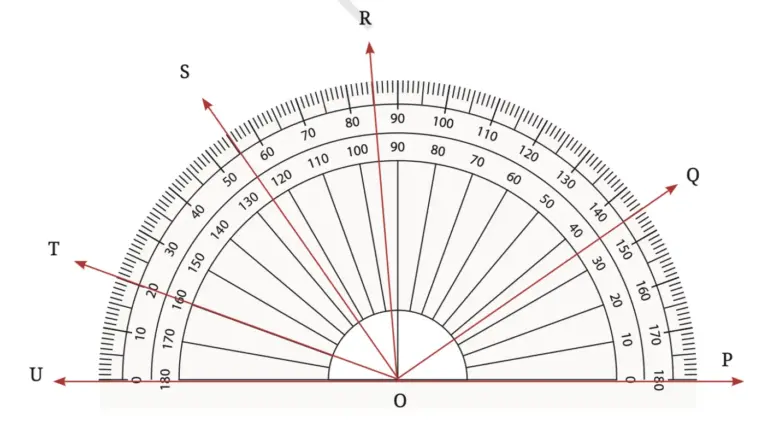
| Angle | Measure | Angle | Measure |
|---|---|---|---|
| ∠POQ | 35° | ∠POR | 95° |
| ∠POS | 125° | ∠POT | 160° |
| ∠QOR | 60° | ∠QOS | 90° |
| ∠QOT | 125° | ∠QOU | 145° |
| ∠ROS | 30° | ∠ROT | 65° |
| ∠ROU | 85° | ∠SOT | 35° |
| ∠SOU | 55° | ∠TOU | 20° |
What is the degree measure of ∠AOB?
Complete the missing angle measures.
Half turn = 180°.
Quarter turn = 90°.
Therefore, the blanks are 180° and 90°.
Continuing with another half fold as shown in Fig. 2.18, we get an angle of measure ______.
In Fig. 2.20, we have ∠AOB = ∠BOC = ∠COD = ∠DOE = ∠EOF = ∠FOG = ∠GOH = ∠HOI = _____ . Why?

Each angle is 22.5°.
The straight angle of 180° is divided into 8 equal parts:
1. Find the degree measures of the following angles using your protractor.

The shown angles are approximately 47°, 23° and 108°, according to their respective diagrams.
3. Find the degree measures for the angles given below. Check if your paper protractor can be used here!
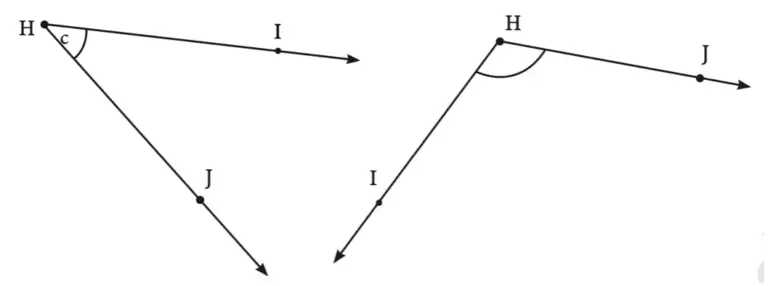
The given angles are 42° and 116°.
A paper protractor cannot be used for the angle that extends beyond the semicircular measuring range in the shown figure.
4. How can you find the degree measure of the angle given below using a protractor?
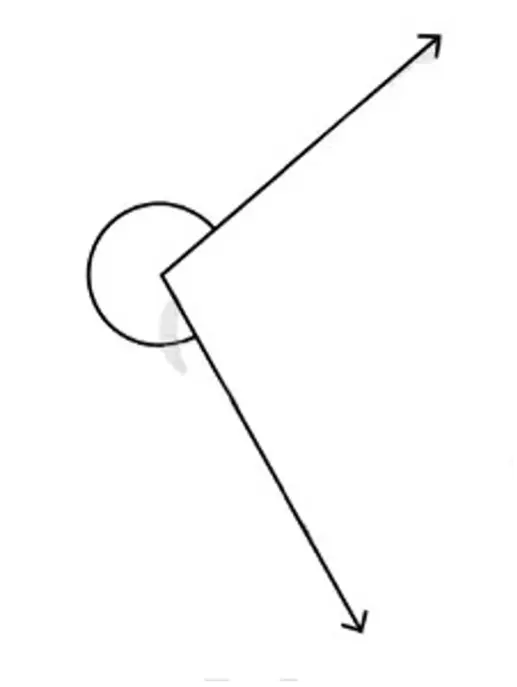
Measure the smaller unmarked angle first.
For the shown example:
5. Measure and write the degree measures for each of the following angles:
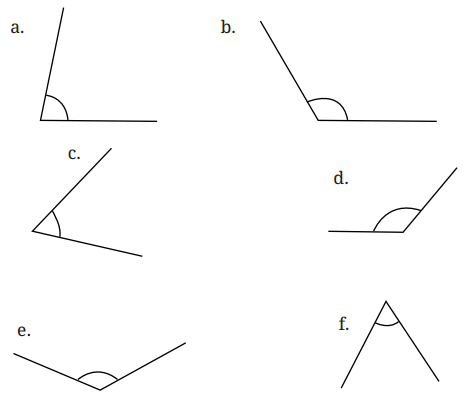
| Part | Measure |
|---|---|
| a | 80° |
| b | 120° |
| c | 60° |
| d | 130° |
| e | 130° |
| f | 60° |
6. Find the degree measures of ∠BXE, ∠CXE, ∠AXB and ∠BXC.
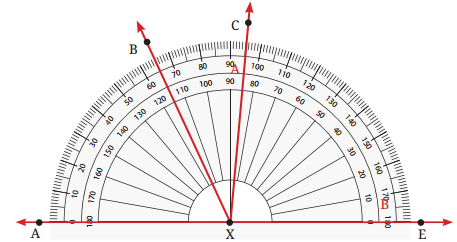
∠BXE = 115°
∠CXE = 85°
∠AXB = 65°
∠BXC = 30°
7. Find the degree measures of ∠PQR, ∠PQS and ∠PQT.
∠PQR = 45°
∠PQS = 100°
∠PQT = 150°
8. Make the paper craft as per the given instructions. Then, unfold and open the paper fully. Draw lines on the creases made and measure the angles formed.

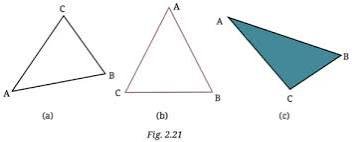
9. Measure all three angles of the triangle shown in Fig. 2.21 (a), and write the measures down near the respective angles. Now add up the three measures. What do you get? Do the same for the triangles in Fig. 2.21 (b) and (c). Try it for other triangles as well, and then make a conjecture for what happens in general!
A student used a protractor to measure the angles as shown below. In each figure, identify the incorrect usage(s) of the protractor and discuss how the reading could have been made and think how it can be corrected.

- The centre of the protractor must be exactly on the vertex.
- One arm of the angle must be aligned with the 0° line.
- Always read the scale that begins with 0° on the arm being used.
- For a reflex angle, measure the smaller angle and subtract it from 360°.
1. Angles in a clock:
a. The hands of a clock make different angles at different times. At 1 o’clock, the angle between the hands is 30°. Why?
b. What will be the angle at 2 o’clock? And at 4 o’clock? 6 o’clock?
c. Explore other angles made by the hands of a clock.

a. A full circle is 360° and a clock has 12 equal divisions.
So, each hour mark is 30° apart.
b.
- 2 o’clock = 60°
- 4 o’clock = 120°
- 6 o’clock = 180°
c. For example, 3 o’clock = 90° and 9 o’clock = 270° for the reflex angle.
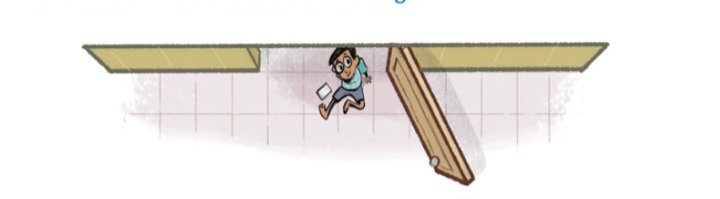
2. The angle of a door: Is it possible to express the amount by which a door is opened using an angle? What will be the vertex of the angle and what will be the arms of the angle?
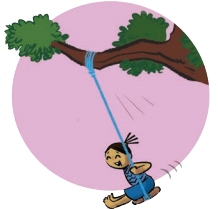
3. Vidya is enjoying her time on the swing. She notices that the greater the angle with which she starts the swinging, the greater is the speed she achieves on her swing. But where is the angle? Are you able to see any angle?
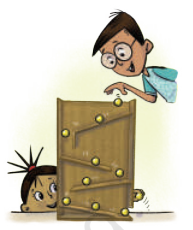
4. Here is a toy with slanting slabs attached to its sides; the greater the angles or slopes of the slabs, the faster the balls roll. Can angles be used to describe the slopes of the slabs? What are the arms of each angle? Which arm is visible and which is not?
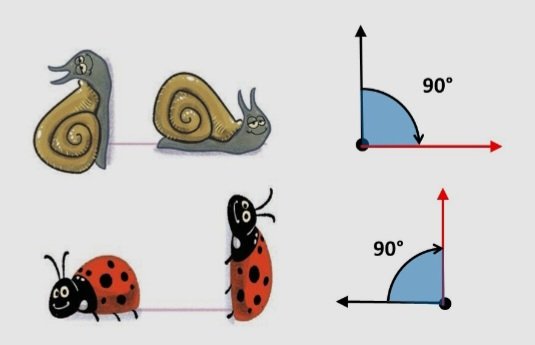
5. Observe the images below where there is an insect and its rotated version. Can angles be used to describe the amount of rotation? How? What will be the arms of the angle and the vertex?
1. In Fig. 2.23, list all the angles possible. Did you find them all? Now, guess the measures of all the angles. Then, measure the angles with a protractor. Record all your numbers in a table. See how close your guesses are to the actual measures.

Some of the possible named angles are:
∠CAP, ∠ACD, ∠APL, ∠DLP, ∠RPL, ∠SLP, ∠PRS, ∠LSR, ∠BRS and ∠CLP.
Students should first estimate and then check each angle using a protractor.
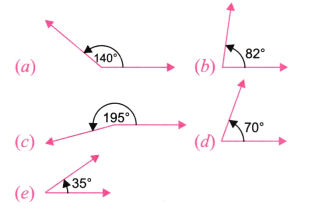
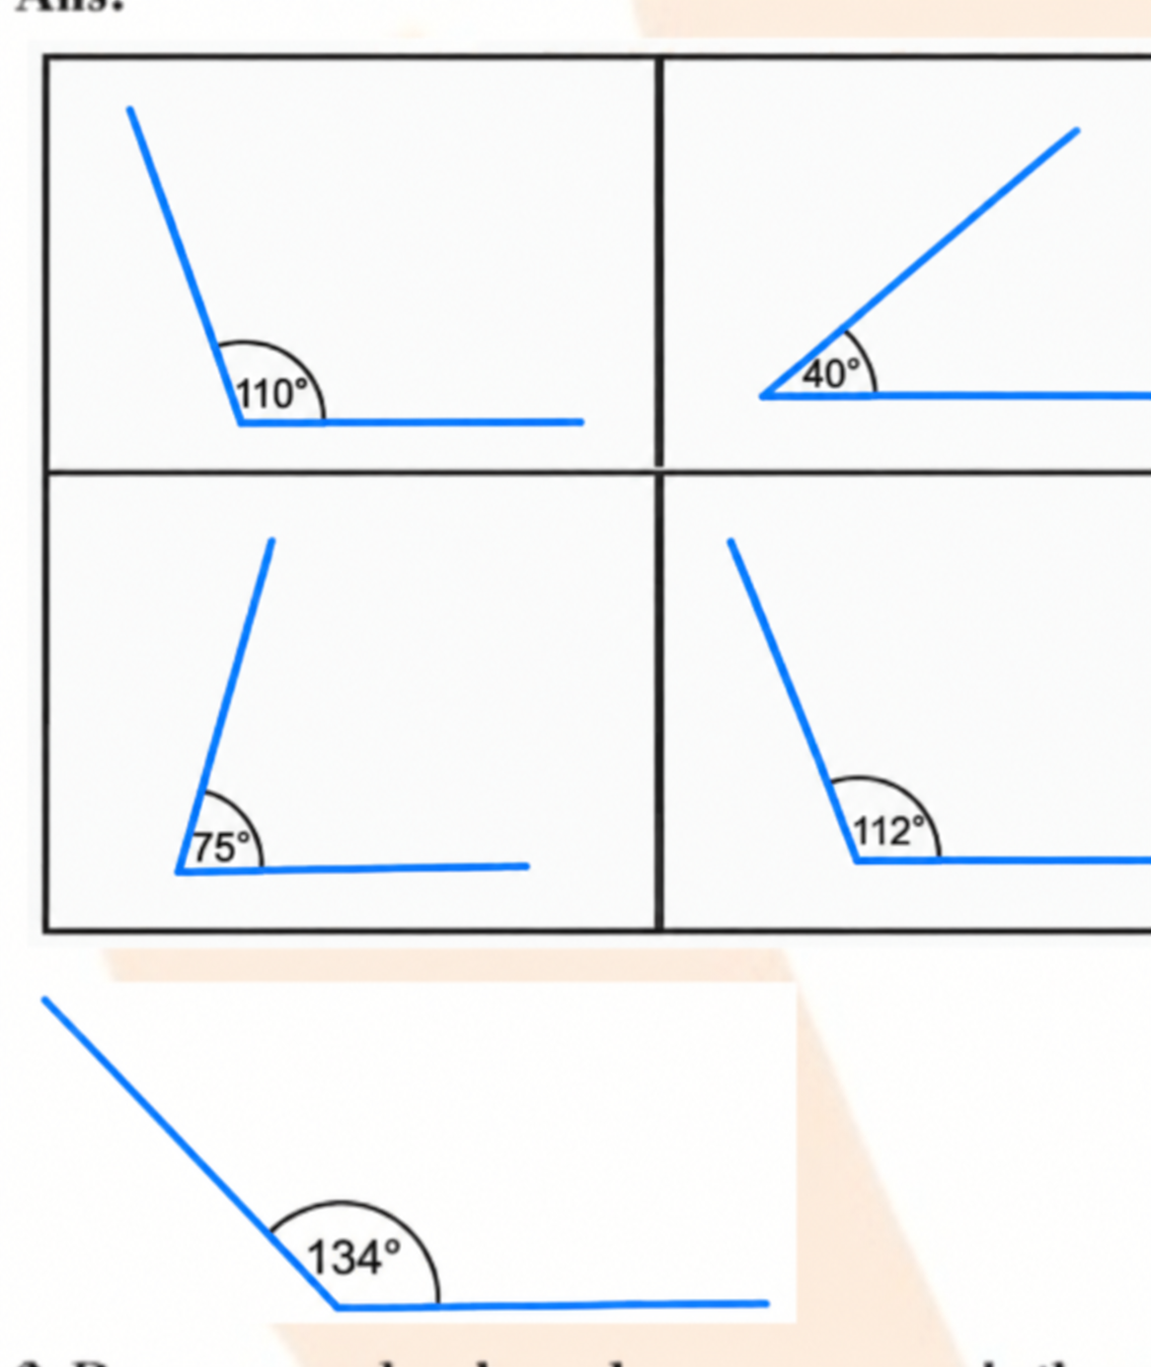
2. Use a protractor to draw angles having the following degree measures:
a. 110°
b. 40°
c. 75°
d. 112°
e. 134°
3. Draw an angle whose degree measure is the same as the angle given below. Also, write down the steps you followed to draw the angle.
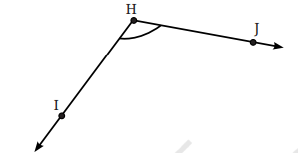
- Place the protractor at the vertex of the given angle.
- Read its degree measure.
- Draw a new base ray.
- Place the protractor correctly.
- Mark the same degree measure.
- Join the vertex to the mark.
Q1. in each of the below grid , join A to other grid points in the figure by a straight line to get
2. Use a protractor to find the measure of each angle. Then classify each angle as acute, obtuse, right or reflex.
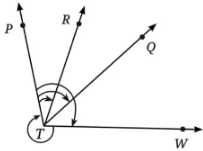
| Angle | Measure | Type |
|---|---|---|
| ∠PTR | 30° | Acute |
| ∠PTQ | 60° | Acute |
| ∠PTW | 102° | Obtuse |
| ∠WTP | 258° | Reflex |
In this figure, ∠TER = 80°. What is the measure of ∠BET? What is the measure of ∠SET?
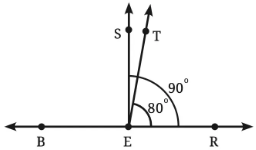
Since ∠REB is a straight angle:
Since ∠BES is a right angle: