Class 6 Khel Yatra Unit 5 Chapter 3 Āsanas – easy notes, concepts, yogic practices, questions and answers, and worksheet. Learn about different yoga postures, their basic practices and benefits in simple language.
Class 6 Khel Yatra
Chapter 3 – Āsanas
Easy colourful notes, textbook prompts, simple explanations, benefits, limitations and Yoga practice guidance.
Āsana is the third limb of Ashtāṅga Yoga. Āsanas are specialised body postures that help the body become flexible, strong and balanced.
Mahārṣi Patanjali defines Āsana as “Sthirm Sukham Āsanam”, meaning being able to stay in a comfortable position for an extended period.
When Āsanas are combined with awareness of breathing, they help develop a deeper connection between the body and mind.
Easy Meaning
An Āsana is a Yoga posture. We practise it carefully so that our body can become stronger, more flexible and balanced while our mind becomes calm.
1. Strength and Flexibility
Regular practice can improve muscle strength, flexibility and balance. Different poses work on different muscle groups.
2. Internal Systems
Āsanas support blood flow and oxygen delivery. Some poses also stimulate internal organs and may support digestion and metabolic functions.
3. Concentration and Relaxation
Focusing on the body and breath can help calm the mind and reduce stress.
4. Mind-Body Connection
Āsanas help us become more aware of the connection between the body and mind.
- Yoga practice should be done in clean and well-ventilated place.
- Always use a mat for practice.
- Āsanas should always be performed empty stomach. Avoid the practice of Āsanas for at least four hours after having food. Best is in the morning before going to school.
- Spectacles, wrist watches and jewellery should be removed before doing the practice.
- Wear loose and comfortable clothes.
- Follow the steps given for each Āsanas and maintain each posture with closed eyes if possible.
- Keep the body relaxed and be aware of your breathing while practising.
- If you have any health problems, inform your teacher before starting Yogic practices.
- Relax after performing the Āsanas.
- Perform all Āsanas under the guidance of a teacher.
| Type | Āsana |
|---|---|
| Standing | Ardhakaṭicakrāsana |
| Sitting | Padmāsana |
| Prone | Bhujaṅgāsana |
| Prone | Shalabhāsana |
| Supine | Uttanapadāsana |
Sthiti: Tādāsana
Ardhakaṭicakrāsana is a standing posture involving lateral bending of the body.
Step 1
While inhaling, raise the right hand up at a 180° angle. Let the right bicep touch the right ear, with the palm facing the left side. Inhale and stretch up further. Feel the stretch from the toes to the fingers.
Step 2
While exhaling, laterally bend towards the left side at the trunk region. Feel the stretch from the toes to the fingers. Feel the compression on the left side and the extension on the right. Stay in this posture for a few minutes with ease and pleasure.
Step 3
While inhaling, bring the right hand back at a 180° angle. Inhale and stretch up further.
Step 4
While exhaling, release the hand down. Relax in Śithila Tādāsana.
Repeat the Āsana on the left side.
Benefits – Page 146
- Ardhakaṭicakrāsana helps to reduces the fat around waist region, provides lateral bending to the spine and improves the liver function.
- The practice helps keeping the spine flexible and healthy. It also strengthens the legs, knees, thighs and calf muscles.

Sthiti: Daṇḍāsana
Padmāsana is a sitting posture used for meditation and calmness.
Step 1
While inhaling, fold the right leg and keep it on the root of the left thigh.
Step 2
While exhaling, fold the left leg and keep it on the root of the right thigh. Adopt Cin Mudra in both the hands and place it on the thighs. Keep the back erect, neck free and face smiling. Close the eyes and stay in this posture for a few minutes with ease and pleasure.
Step 3
While inhaling unfold the left leg.
Step 4
While exhaling, unfold the right leg and come to Daṇḍāsana. Relax in Śithila Daṇḍāsana.
Repeat the Āsana with the left leg.
Benefits – Page 148
- Padmāsana is called ‘the destroyer of disease’ and good meditative posture.
- It stimulates the nerves in the lower back and increases the flow of blood to them.
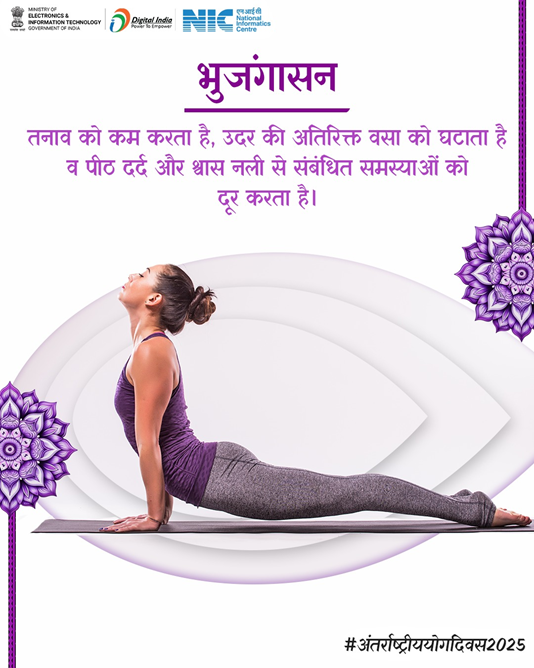
Sthiti: Prone posture
Bhujaṅgāsana is also known as the Serpent or Cobra posture.
Step 1
Keep the hands by the side of the chest, with the palms facing down and chin on the ground.
Step 2
While inhaling, raise the body till the hands are straight. Keep your eyes closed. Stay in this posture for a few minutes.
Step 3
While exhaling, slowly come down and place the forehead on the ground.
Step 4
Move both hands above the head, with palms facing down. Rest your forehead on the ground and keep your eyes gently closed. Relax in Makarāsana.
Benefits – Page 150
- Bhujaṅgāsana brings flexibility to the spine and strengthens the spinal muscles.
- It reduces the abdominal fat.
- It is useful for respiratory disorders.

Sthiti: Prone posture
Shalabhāsana is the Locust posture. It is performed while lying on the stomach.
Step 1
Make a fists with both hands and place them below the thighs. Then place your chin on the ground.
Step 2
While inhaling, raise both legs without bending the knees. Stay in this posture with your eyes closed for a few minutes.
Step 3
While exhaling, slowly place the legs on the ground.
Step 4
Raise both the hands above the head. Palms facing down. Forehead on the ground. Eyes gently closed. Relax in Makarāsana.
Benefits – Page 152
- Shalabhāsana helps in keeping the spine healthy and flexible.
- It strengthens the hips, thighs, knees and calf muscles.
- It enhances the functioning of the kidney.
- Ensure students are careful while performing this in case of lower back pain.
- Ask whether the students are able to maintain the final posture without any discomfort.
- Ask them to observe their breathing during the practice.
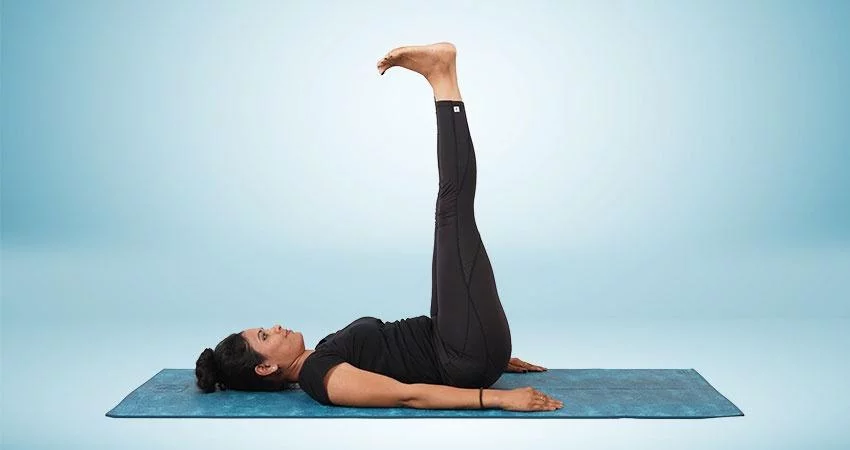
Sthiti: Supine posture
In a supine posture, the practitioner lies on the back.
Step 1
While inhaling, raise both the legs at a 45° angle.
Step 2
Inhaling further, raise both the legs to at a 90° angle. Maintain the posture for as long as you can, breathe normally.
Step 3
While exhaling, slowly bring both legs at a 45° angle.
Step 4
Exhaling further, place both the legs on to the mat. Relax in Śavāsana.
Benefits – Page 154
- Uttanapadāsana brings flexibility to the spine and strengthens the spinal muscles.
- It reduces the abdominal fat.
After performing Āsana, it is advisable to perform relaxation. This helps in releasing any tension in the body and calms down the mind.
Lie on your back with legs apart, hands apart and palms facing the roof. Release the whole body and relax.
Observation of Abdominal Movements
Observe the rise and fall of the abdomen as you breathe. Observe for five rounds.
Synchronise Breathing with Abdominal Movements
Slow down the breathing and synchronise it with abdominal movements.
While inhaling, the abdomen rises up and while exhaling, take over sinks.
Each inhalation and exhalation together form one round. Observe for five rounds.
Observation of Feelings
While inhaling, feel the body becoming light and energetic.
While exhaling, feel the body collapsed and relaxed. Observe for five rounds.
The supplied chapter text contains a small number of direct questions or question-style teacher prompts. Their wording below is kept unchanged.
| Āsana | Type | Easy Point |
|---|---|---|
| Ardhakaṭicakrāsana | Standing | Lateral bending posture. |
| Padmāsana | Sitting | Lotus posture and meditative sitting posture. |
| Bhujaṅgāsana | Prone | Serpent or Cobra posture. |
| Shalabhāsana | Prone | Locust posture. |
| Uttanapadāsana | Supine | Raised leg posture. |
Looking for a practice worksheet?Try this easy and useful worksheet for unit 5 chapter 3to practise what you have learned. It includes important questions and activities to help you check your understanding, strengthen your concepts and prepare better for exams
Class 6 Khel Yatra Unit 5 Chapter 3, Āsanas, Asanas Class 6, Class 6 Khel Yatra, Khel Yatra Unit 5 Chapter 3, Class 6 Physical Education, Yoga Class 6, Class 6 Khel Yatra notes, Class 6 Khel Yatra solutions, yoga postures, asana benefits, Khel Yatra worksheet.