Class 7 Khel Yatra Unit 6 Chapter 2 – Yoga Sadhana with easy Notes, Solutions, Questions & Answers and Worksheet. Learn important concepts and practices of Yoga Sadhana with simple and student-friendly Class 7 study material.
Class 7 Khel Yatra
Chapter 2 – Yoga Sadhana
Notes, Practice, Easy Solutions and Surya Namaskara
Reprint 2026–27 | Pages 164–177
Yoga Sadhana
In the previous chapter, we learnt about Yama and Niyama. In this chapter, we learn and practise Āsana, Prānāyāma, Pratyāhāra, Dhārana and Dhyāna.
We also learn breathing practices, Sūkshma Vyāyāma, Śithalīkarana Vyāyāma, Sūrya Namaskāra and Krīdā Yoga.
Regular practice or Sadhana helps us become stronger, focused, flexible and calm.
Introduction to Yoga Sadhana
Yoga Sadhana means regular and sincere practice of Yoga. Regular practice helps students improve physical flexibility, strength, concentration and calmness.
General Guidelines for Practicing Yoga
- Breathe normally: Do not force deep breaths or hold your breath. Breathe normally through your nose.
- Be aware: Pay attention to your breath, muscle stretch and relaxation while practising.
- Stay focused: Watch your teacher and follow instructions. Focus on your own posture.
- Rest if unwell: If you feel unwell, such as having a cold, headache or stomach ache, rest and ask your teacher for guidance.
Āsana Guidelines
- Warm-up first: Begin with warm-up exercises like Sūkshma Vyāyāma and Śithalīkarana Vyāyāma.
- Practice on an empty stomach: Morning is a good time. If practising later, wait 2–3 hours after eating.
- Breathing: Breathe naturally through your nose with slow, deep breaths.
- Wear comfortable clothing: Wear loose, comfortable clothes and practise without shoes and socks.
- Avoid strain and over-stretching: Listen to your body. If a posture feels painful, gently come out of it.
- Focus on alignment: Proper alignment helps you practise the posture correctly.
- Stay calm and focused: Avoid talking during practice. Focus on the posture and your body.
- Cool-down with relaxation: After Āsanas, relax in Shavāsana or another relaxation posture.
- Be consistent: Regular practice is better than occasional practice.
Prānāyāma Guidelines
- Breathe naturally: Always breathe through your nose. Prānāyāma should be natural and easy. If you feel dizzy, stop and inform the teacher.
- Sit comfortably: Sit with your back straight and hands resting on your knees.
- Start slowly: Begin with a few minutes and build up slowly.
- Check with the teacher: If you have respiratory issues such as asthma or if you are feeling unwell, check with the teacher before practising Prānāyāma.
Sūkshma Vyāyāma
Sūkshma Vyāyāma is a series of gentle exercises that loosen joints, release tension and improve flexibility and strength.
The Sanskrit word Sūkshma means subtle or micro, while Vyāyāma means exercise or movement.
These exercises are simple and can be performed while sitting or standing. They are also useful for beginners and people with limited mobility.
Practices in this Grade
Practice 1
Aṅgulī Śakti Vikāsaka
Strengthening of the fingers.
Practice 2
Maṇi Bandha Śakti Vikāsaka
Strengthening of the wrist.
Practice 3
Maṇi Bandha Chakra
Wrist joint rotation clockwise and anti-clockwise.
Practice 4
Kehuni Śakti Vikāsaka
Strengthening of elbows.
Practice 5
Skandha Chakra
Strengthening of the shoulder joint.
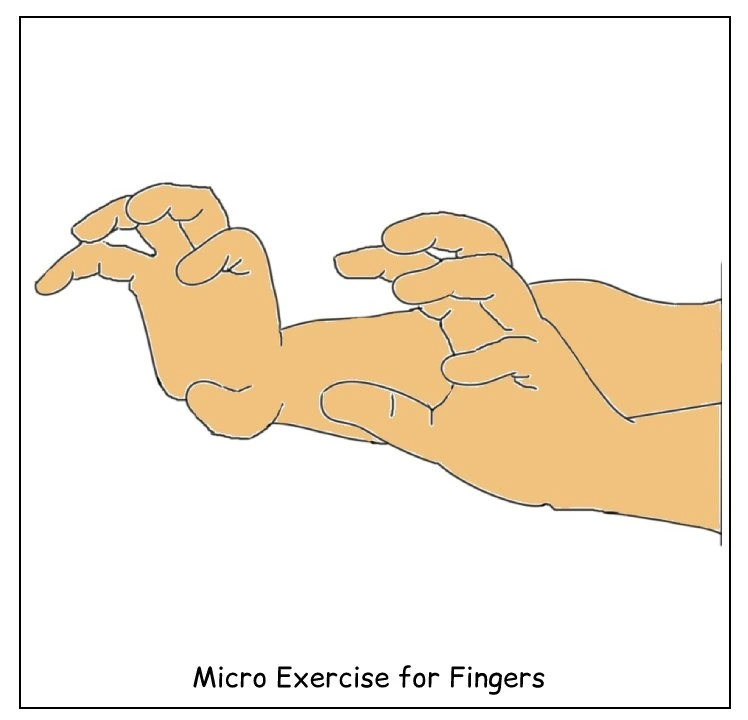
Practice 1 – Aṅgulī Śakti Vikāsaka
Purpose: Strengthening of the fingers.
Sthiti
Vajrāsana or Sukhāsana.
1 Starting Position
Raise both hands in front of the body at shoulder level.
2 Stretch the Fingers
While inhaling, stretch your fingers.
3 Make a Fist
While exhaling, compress your fingers and form a fist with the thumb inside. This completes one round. Repeat the practice 10 times.
4 Relax
After completing the practice, place your hands on your thighs and relax in Vajrāsana.
Śithalīkarana Vyāyāma
Śithalīkarana Vyāyāma is a set of loosening exercises that prepares the body for more intense Yoga practices.
These exercises improve flexibility, endurance, strength, spinal flexibility, joint mobility and circulation.
Practices in this Grade
Practice 1
Forward-backward bending
Helps improve mobility and flexibility of the spine.
Practice 2
Side bending
Helps loosen and stretch the body.
Practice 3
Bending and twisting
Combines bending with gentle twisting.
Practice 4
Twisting
Provides gentle movement for the spine.
Practice 1 – Forward-backward Bending
Stithi
Tāḍāsana
Viśrānti
Śithila Tāḍāsana
1 Bend Backward
Keep your legs apart. While inhaling, bend backward.
2 Bend Forward
While exhaling, bend forward and swing your hands. Repeat this practice 10 times.
Sūrya Namaskāra
Sūrya Namaskāra is a sequence of Yoga poses performed one after another. It combines Āsana, Prānāyāma and mantras.
The Sun provides light and warmth that are essential for life on Earth. It is also an important source of Vitamin D. Sūrya Namaskāra is a way of greeting and showing gratitude for the Sun.

Benefits of Sūrya Namaskāra
- Strengthens muscles and improves flexibility.
- Supports cardiovascular health.
- Stimulates digestion and metabolism.
- Works various muscle groups including arms, legs, core and back.
- Improves endurance and stamina.
- Combined with mindful breathing, it can help reduce stress and support mental clarity and focus.
- May improve mood.
- Can support anger management, self-esteem and academic achievement.
Step 1 – Pranamāsana
Pranamāsana is the starting prayer posture.
Adopt Namaskāra Mudra and chant the prayer given in the textbook.
Step 2 – Hasta Utthanāsana
While inhaling, raise both hands above the head and bend the trunk backward as much as possible.
- Let the biceps touch the ears.
- Feel the stretch from the navel to the head.
- There is a contraction at the back.
Step 3 – Padahastāsana
While exhaling, slowly bend forward and place the hands beside the feet.
- Let the forehead move towards the knees.
- Let the abdomen rest on the thighs.
- Regular practice makes the movement easier.
Step 4 – Ashwa Sanchālanāsana
- While inhaling, slightly bend the knees and stretch the right leg back.
- Keep the right knee and toes on the ground.
- Fold the right thigh and let the chest rest on it.
- Place the left foot so that the area from toe to knee is perpendicular to the ground.
- Lower the spine, arch the chest and look up.
- The left leg and palms should be in a straight line.
Step 5 – Dandāsana
- While exhaling, take the right leg back.
- Bring the whole body into a straight line.
- Keep the arms perpendicular to the floor.
- The body looks like a slide in the final position.
Step 6 – Ashtāṅga Namaskara
In this posture, eight parts of the body touch the floor:
- Forehead
- Chest
- Two palms
- Two knees
- Two toes
The abdomen should not touch the ground. The hips are raised slightly upward.
Step 7 – Bhujangāsana
- While inhaling, slowly raise the body upward.
- Raise the head towards the ceiling.
- Let the spine arch.
- Keep the thighs and hips on the floor.
- Use the arms to support the trunk.
Step 8 – Parvatāsana
- While exhaling, raise the waist.
- Keep the palms and feet flat on the ground.
- Bring the head towards the floor.
- Distribute body weight between the palms and feet.
Step 9 – Ashwasanchālanāsana
- While inhaling, bring the right leg between the palms.
- Keep the left knee and toes on the ground.
- Fold the right thigh and let the chest rest on it.
- Keep the left foot positioned so that the toe-to-knee area is perpendicular to the ground.
- Lower the spine, arch the chest and look up.
- The left leg and palms should be in a straight line.
Step 10 – Padahastāsana
- While exhaling, slowly bend forward.
- Place the hands beside the feet.
- Let the forehead move towards the knees.
- Let the abdomen rest on the thighs.
- Continuous practice makes the movement easier.
Step 11 – Hasta Utthanāsanā
- While inhaling, raise both hands above the head.
- Bend the trunk backward as much as possible.
- Let the biceps touch the ears.
- Feel the stretch from the navel to the head.
- Keep the face smiling and eyes gently closed.
Step 12 – Pranamāsana
Slowly come back to Step 1 and return to Pranamāsana.
Pranamāsana → Hasta Utthanāsana → Padahastāsana → Ashwa Sanchālanāsana → Dandāsana → Ashtāṅga Namaskara → Bhujangāsana → Parvatāsana → Ashwasanchālanāsana → Padahastāsana → Hasta Utthanāsanā → Pranamāsana
Chapter 2 at a Glance
| Topic | What to Remember |
|---|---|
| Yoga Sadhana | Regular and sincere practice of Yoga. |
| Āsana | Yoga postures practised with awareness and correct alignment. |
| Prānāyāma | Regulation and awareness of breathing. |
| Sūkshma Vyāyāma | Gentle exercises for joints, flexibility and relaxation. |
| Śithalīkarana Vyāyāma | Loosening exercises that prepare the body for Yoga practices. |
| Sūrya Namaskāra | A sequence of Yoga postures combined with breathing and mantras. |
| Pranamāsana | Starting and ending posture of the sequence given in this chapter. |
Easy In-text Questions and Answers
Important Safety Points
- Always follow the teacher’s instructions.
- Do not force your body into a posture.
- Do not hold the breath unnecessarily.
- Stop if you feel dizzy or unwell.
- Practise on an empty stomach as advised in the chapter.
- Use comfortable clothing.
- Warm up before Āsanas.
- Relax after completing the practice.
- Students with health or respiratory concerns should seek appropriate guidance before practising.
Chapter Summary
Chapter 2, Yoga Sadhana, teaches students how regular Yoga practice can support strength, flexibility, concentration and calmness. The chapter explains important guidelines for Āsana and Prānāyāma, followed by Sūkshma Vyāyāma and Śithalīkarana Vyāyāma.
The chapter also explains Sūrya Namaskāra and its twelve-step sequence, beginning with Pranamāsana and ending with Pranamāsana. Students are encouraged to practise gradually, safely and with awareness under the guidance of their teacher.
Practice important questions and revision exercises with this easy Class 7 Khel Yatra worksheet for unit 6 chapter 2 . It is useful for chapter revision, practice and exam preparation
Class 7 Khel Yatra Unit 6 Chapter 2, Class 7 Khel Yatra Yoga Sadhana, Yoga Sadhana Class 7, Class 7 Yoga Sadhana Notes, Class 7 Khel Yatra Unit 6 Chapter 2 Notes, Class 7 Khel Yatra Yoga Solutions, Yoga Sadhana Questions and Answers Class 7, Class 7 Khel Yatra Worksheet, Yoga Sadhana Worksheet Class 7, Class 7 Khel Yatra Unit 6 Notes, Class 7 Yoga Notes, Class 7 Khel Yatra Study Material